(567)-225-6261

  • Home
  • Bathrooms
  • Commercial Services
  • Gallery
  • About
  • Best Practices
  • More
    • Home
    • Bathrooms
    • Commercial Services
    • Gallery
    • About
    • Best Practices
  • Sign In
  • Create Account

  • Bookings
  • My Account
  • Signed in as:

  • filler@godaddy.com


  • Bookings
  • My Account
  • Sign out

(567)-225-6261

Signed in as:

filler@godaddy.com

  • Home
  • Bathrooms
  • Commercial Services
  • Gallery
  • About
  • Best Practices

Account


  • Bookings
  • My Account
  • Sign out


  • Sign In
  • Bookings
  • My Account

Tile waterproofing

Here at M&B Remodeling, we ensure our tile installations withstand the test of time by using the newest waterproofing technology. Made of polyethylene, DITRA and DITRA-XL serve as a waterproofing layer that protects moisture-sensitive substrates, such as plywood/OSB. Free-space on the underside of the matting provides a route for excess moisture and vapor to prevent damage to the tile layer above.

OUR PROCESS TO ENSURE YOUR FLOOR LASTS FOR YEARS TO COME.

At M&B Remodeling,  our floor installers  take detailed steps to ensure our work withstands the test of time. Quality flooring is all in the preparation and we take this seriously. Before every install we take the steps below to ensure the floors is ready to accept the type of flooring you choose, and that it lasts well after our job is complete. 

What is a subfloor?

A subfloor is the bottom-most structural level of your floor. It supports your decorative floor finish, whether it’s carpet, hardwood, vinyl, laminate or tile. 

  • Preparation for installing floor tile depends on the type of subfloor in the room you are tiling. Concrete subfloors are prepared differently than wood subfloors.
  • The subfloor must be able to hold the weight of the tile and preparation materials required to complete the installation.
  • Underlayment is the material placed on top of the subfloor that assists in the installation of the tile or other type of flooring.

Prepare a Wood Subfloor for Tile

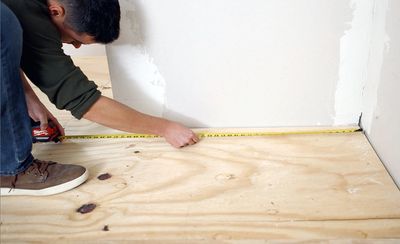
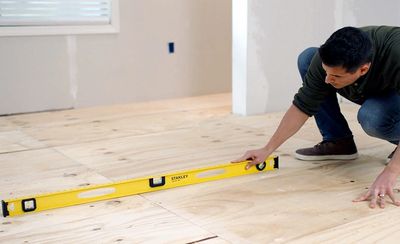
A successful tile installation project requires a level surface.

  •  We check for dips in the floor by sliding a 4-foot to 6-foot straight edge in different directions all around the room. We then mark any uneven spots we find so that we  can make them level.
  • Fill seams in the subfloor with caulk. Tape off any affected vents with painter’s tape.
  • Sand down any uneven or high spots. 
  • Pour the liquid underlayment into any dips in the floor. It will seek its own level, and once dry will create a flat and even surface.

Attach Backer Board to Wood Subfloor

We install a cement-based backer board following the manufacturer’s instructions. This provides a solid surface under the tile that prevents flexing that could lead to cracking.

Backer board panels typically measure 3-feet by 5-feet and can be trimmed as needed. 

  • We use a polymer-modified thin-set – a type of mortar – to attach the backer board to the subfloor. The polymer-modified thin-set provides additional strength and helps eliminate any movement between the backer board and the subfloor.
  • We arrange the panels so that the ends are staggered and don’t align with each other. In other words, we ensure  that no four corners of the backer board touch. Also, if your subfloor runs east to west, we lay your backer boards in the opposite direction, north to south.
  • W leave a 1/4-inch gap between the edges of the backer board and the walls to allow for subfloor expansion and contraction.
  • After all backer board sheets are in position, we reinforce the joints with self-adhesive alkaline-resistant fiberglass tape specially made for backer board.
  • Well then cover the tape with thin-set mortar and level it with a straight edge.  
  • We smooth any ridges or high spots, then feather the edges of the thin-set across each board to make the surface as smooth as possible.


Prepare a Concrete Subfloor for Tile

As with a wooden subfloor, a concrete subfloor must be level for successful tile installation. Additionally, steps must be taken to ensure that a concrete floor will create a solid bond. 

Your concrete floor should be clean, dry, flat and free of adhesives. Residue from strippers or cleaners should also be cleaned and rinsed with water. A concrete floor must be free of adhesives so that the tile will bond to it the right way.

  • To prepare your concrete subfloor, we make sure that it can accept water penetration. We test by sprinkling water on various areas of the subfloor. If water penetrates and leaves a wet spot, then a good bond can be achieved. If the water beads, adhesives or other contaminants are present. They may cause loss of bonding. Contaminants are removed before installation.
  • The concrete must be free of efflorescence or salts on the surface. It must not be subject to hydrostatic pressure or moisture penetrating the slab from below. Concrete subfloors should have a coarse finish to form the bond with the thin-set. Smooth concrete slabs must be etched or roughed up using chemical or mechanical methods to achieve a good bond.
  • We slide a 4- to 6-foot straight edge in different directions all around the room to check how level the floor is. If there are hollows and valleys, we fill with a self-leveling underlayment made for this purpose.


Level Concrete Subfloor and Install Crack Prevention

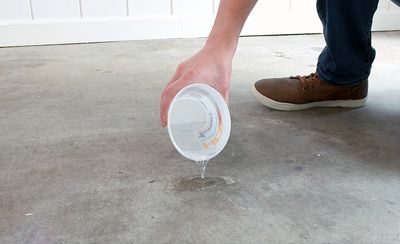
A self-leveling compound can be poured over the entire surface if the subfloor has several high and low spots. If you have uneven spots, we will need to treat those areas. 

  • We will use a self-leveling compound to ensure there are no high or low spots in the subfloor.
  • If there are cracks larger than 1/8-inch in your concrete subfloor, those will be patched and filled with a cement patching compound.
  • Concrete subfloors move, shift and crack over time. To prevent that movement from creating cracks in your grout and tile, we install a crack prevention membrane after the concrete subfloor is clean, flat and free of cracks larger than 1/8-inch. 

M&B Remodeling

567-225-6261

Copyright © 2024 M&B Remodeling - All Rights Reserved.

Powered by

This website uses cookies.

We use cookies to analyze website traffic and optimize your website experience. By accepting our use of cookies, your data will be aggregated with all other user data.

DeclineAccept